How to Fix a Stuck Luggage Wheel
*We may earn a commission for purchases made using our links. Please see our disclaimer to learn more.
There’s nothing more frustrating than arriving at the airport, ready for a journey, only to discover that a luggage wheel has decided to stop cooperating. A stuck or jammed wheel can turn a smooth travel experience into an exhausting drag through terminals, hotel lobbies, and train stations. The good news is that most luggage wheel problems can be fixed at home with minimal tools and a bit of patience.
Whether the wheel is completely immobile, squeaking incessantly, or wobbling unpredictably, understanding the root cause and having the right repair techniques can save both money and the hassle of replacing perfectly good luggage. This comprehensive guide walks through everything needed to diagnose and fix common luggage wheel issues, from simple debris removal to more complex bearing replacements.
“Regular maintenance of luggage wheels can extend their functional life by several years, preventing the need for premature luggage replacement and reducing travel frustrations.”
— Travel Gear Manufacturers Association
Key Takeaways
- Most stuck luggage wheels are caused by debris, hair, or thread wrapped around the axle
- Basic household tools like screwdrivers, pliers, and scissors are usually sufficient for repairs
- Cleaning and lubricating wheels regularly can prevent future jamming issues
- Wheel replacement is straightforward and costs significantly less than new luggage
- Regular maintenance extends luggage lifespan and ensures smooth travels
Understanding Luggage Wheel Mechanisms
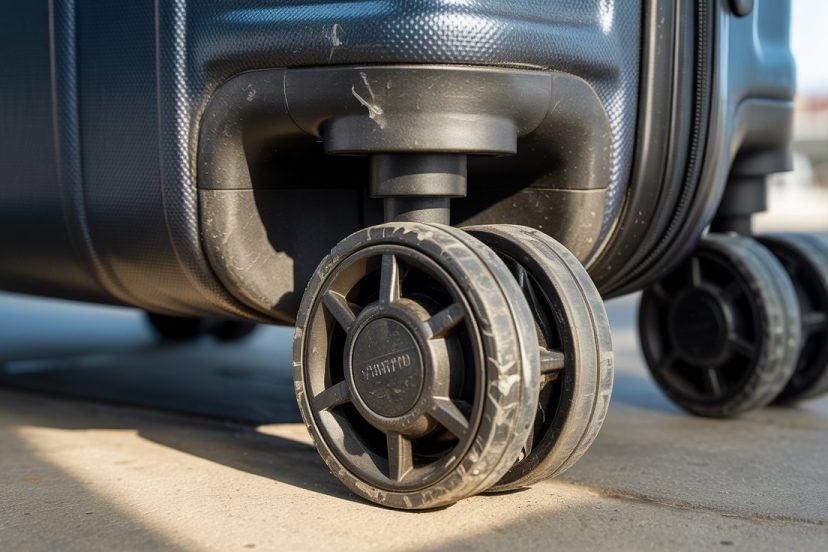
Before diving into repairs, it helps to understand how luggage wheels actually work. Most modern suitcases feature inline skate-style wheels that rotate 360 degrees, allowing for smooth multidirectional movement. These wheels typically consist of several components: the wheel itself (made from polyurethane, rubber, or plastic), ball bearings or bushings that enable rotation, an axle that holds everything in place, and a housing unit that attaches to the luggage frame.
The wheel assembly is designed for durability, but constant exposure to various surfaces, weather conditions, and the weight of packed belongings takes its toll. Airport floors, sidewalk cracks, gravel paths, and hotel carpets all contribute to wear and tear. Understanding this construction makes troubleshooting much easier, as problems usually stem from interference with one of these key components.
Diagnosing the Problem
The first step in any repair is identifying what’s actually wrong. Turn the luggage upside down or on its side to examine the problematic wheel closely. Try rotating the wheel by hand to determine if it’s completely stuck, partially restricted, or just noisy.
Common symptoms point to specific issues. A completely immobile wheel often indicates something wrapped tightly around the axle or severe bearing failure. Wheels that rotate but make grinding noises typically have damaged bearings or debris lodged inside the mechanism. Wobbly wheels suggest loose axles or worn-out wheel housing. Wheels that rotate but create resistance usually have hair or thread interference, or they need lubrication.
Check all wheels even if only one seems problematic, as issues often develop simultaneously due to similar wear patterns. Look for visible cracks in the wheel material, loose screws or rivets in the housing, and signs of rust or corrosion on metal components.
Tools and Materials Needed
Most luggage wheel repairs require only basic household items. A set of screwdrivers (both Phillips and flathead) handles most disassembly needs. Needle-nose pliers help extract debris and manipulate small components in tight spaces. Sharp scissors or a seam ripper efficiently cut through tangled hair and thread.
For cleaning and lubrication, gather some rubbing alcohol or soapy water, old toothbrushes for scrubbing, lint-free cloths, and silicone-based lubricant or WD-40. Avoid petroleum-based products as they can degrade plastic and rubber components over time.
If replacement becomes necessary, having a tape measure ensures ordering the correct wheel size. Most luggage wheels range from 40mm to 80mm in diameter. Take note of the axle diameter and length as well, typically measured in millimeters.
Step-by-Step Repair Process
Removing Debris and Obstructions
Begin with the simplest solution. Inspect the wheel carefully for visible debris. Hair, thread, plastic bag strips, and fabric fibers commonly wind around the axle where the wheel meets the luggage frame. These materials create friction that gradually slows and eventually stops wheel rotation.
Use scissors to carefully cut away any visible threads or hair. Work slowly to avoid damaging the wheel or housing. For stubborn material wrapped tightly around the axle, needle-nose pliers provide better grip and control. Pull gently but firmly to extract debris without forcing anything that might break delicate components.
Once visible obstructions are removed, try rotating the wheel again. If movement improves but isn’t perfect, proceed with deeper cleaning.
Disassembling the Wheel Assembly
For issues beyond surface debris, the wheel needs to come off. Most luggage wheels are held in place by either a screw, rivet, or snap-fit mechanism. Examine the wheel housing carefully to determine the attachment method.
Screw-attached wheels are the easiest to handle. Simply unscrew the fastener, often located on the inside of the luggage or directly through the wheel housing. Keep all small parts in a container to prevent loss.
Rivet-attached wheels require more effort. These permanent fasteners need drilling out with a small drill bit. Work slowly and carefully to avoid damaging the surrounding housing. Once the old rivet is removed, the wheel can be replaced and secured with a new rivet or a small bolt and nut combination.
Snap-fit wheels may require gentle prying with a flathead screwdriver. Apply even pressure to avoid breaking plastic clips. Some designs feature a release mechanism that, once located, makes removal straightforward.
Cleaning and Maintenance
With the wheel removed, thorough cleaning becomes possible. Wipe down the wheel with a cloth dampened with rubbing alcohol to remove built-up grime and sticky residue. Pay special attention to the bearing area in the wheel’s center.
Use an old toothbrush to scrub stubborn dirt from the wheel treads and housing. For wheels with exposed bearings, carefully clean around each ball bearing, removing any debris that might impede smooth rotation. Some wheels feature sealed bearings that cannot be cleaned internally, but their external surfaces still benefit from wiping.
Inspect the wheel housing and axle mounting point on the luggage. Clean these areas thoroughly as well, removing any rust with fine steel wool if necessary. A clean mounting surface ensures proper wheel alignment when reassembled.
Lubrication
Proper lubrication is crucial for smooth, quiet wheel operation. Apply a small amount of silicone-based lubricant to the axle and any moving parts within the wheel assembly. Silicone lubricant is ideal because it doesn’t attract dirt and grime like oil-based products.
For wheels with accessible bearings, place one drop of lubricant on the bearing mechanism. Avoid over-lubricating, as excess product attracts debris that causes future problems. Spin the wheel several times to distribute the lubricant evenly throughout the mechanism.
If using WD-40, apply sparingly and wipe away excess immediately. While effective for loosening stuck parts, WD-40 is not a long-term lubricant and can attract dirt over time.
Reassembly
Once cleaned and lubricated, reassemble the wheel carefully. Align the wheel properly on the axle, ensuring it sits flush against the housing. Tighten any screws firmly but not excessively, as over-tightening can crack plastic housings or deform the wheel.
For riveted assemblies, installing a small bolt with a lock washer and nut often proves more reliable than a replacement rivet. This method also allows for future maintenance without drilling.
Test the wheel by spinning it freely. It should rotate smoothly without wobbling or resistance. Place the luggage upright and roll it across different surfaces to ensure all wheels function properly together.
When to Replace Rather Than Repair
Sometimes repair isn’t the best option. Wheels with visible cracks, significant chunks missing from the tread, or completely failed bearings need replacement. Attempting to repair severely damaged wheels often results in failure shortly after, potentially at the worst possible moment during travel.
Replacement wheels are surprisingly affordable and widely available online. Most cost between five and twenty dollars per wheel. When ordering replacements, match the wheel diameter, axle size, and mounting style to the original specifications.
Consider replacing all wheels simultaneously if the luggage has seen heavy use. This ensures even wear and consistent rolling characteristics. Mismatched wheel conditions can cause luggage to pull to one side, making it harder to maneuver.
Preventive Maintenance Tips
Regular maintenance prevents most wheel problems before they develop. After each trip, inspect all wheels for wrapped debris and remove anything found. This five-minute check can prevent a stuck wheel from forming over time.
Every few months, apply a small amount of lubricant to the wheel axles. This keeps bearings moving freely and prevents rust on metal components. Wipe away excess lubricant to avoid attracting dirt.
Store luggage properly between trips. Avoid placing heavy items on top of luggage during storage, as this can deform wheels and damage bearings. Store luggage upright or on its back panel rather than on its wheels to reduce unnecessary pressure.
When traveling, avoid unnecessarily rough handling. While luggage must withstand normal travel wear, purposely dragging it over curbs, stairs, or rough terrain accelerates wheel damage. Lifting luggage over obstacles whenever possible extends wheel life significantly.
Dealing with Different Wheel Types
Luggage wheels come in various designs, each with specific characteristics. Inline skate-style wheels, the most common type, feature hard polyurethane construction and smooth rotation. These wheels handle most surfaces well but can accumulate debris in their narrow axle area.
Rubber wheels provide better shock absorption and quieter operation but wear down faster on rough surfaces. They typically feature simpler bearing systems that make maintenance easier but may require more frequent replacement.
Double wheels, found on some high-end luggage, pair two smaller wheels on each corner. This design distributes weight more evenly but doubles the number of components that can fail. Maintenance requires attention to both wheels in each pair.
Spinner wheels rotate 360 degrees and typically feature more complex bearing assemblies. Their multidirectional capability makes them prone to debris accumulation from all angles, requiring more frequent inspection and cleaning.
Troubleshooting Persistent Issues
If wheels continue causing problems after cleaning and lubrication, deeper issues may exist. Stripped screw holes in plastic housing prevent secure wheel attachment. This problem can sometimes be solved by using slightly larger screws or filling the hole with epoxy before reinstalling the screw.
Bent axles cause wheels to wobble no matter how securely fastened. Axle replacement requires finding compatible parts, which may be challenging for older or uncommon luggage brands. In such cases, complete wheel assembly replacement becomes more practical.
Frame damage near the wheel mounting point compromises wheel stability. Cracks in the luggage frame cannot be easily repaired and may indicate the luggage has reached the end of its useful life. Continuing to use luggage with frame damage risks complete failure during travel.
Cost-Benefit Analysis
Professional luggage repair services charge between thirty and sixty dollars per wheel replacement, plus labor. DIY repairs cost only a few dollars for lubricant or ten to twenty dollars for replacement wheels. Given that quality luggage costs two hundred dollars or more, investing an hour and twenty dollars in repairs makes excellent financial sense.
However, extensive repairs on inexpensive luggage may not be worthwhile. If the luggage cost under fifty dollars new and requires multiple wheel replacements plus other repairs, purchasing new luggage might be more economical. Consider the luggage’s overall condition, age, and quality when deciding between repair and replacement.
Environmental Considerations
Repairing luggage rather than replacing it reduces waste and environmental impact. The manufacturing process for luggage involves significant resources, from petroleum-based plastics to metal components and shipping costs. Extending luggage life through simple repairs aligns with sustainable consumption practices.
When wheels do need replacing, check if the old wheels can be recycled. Some communities accept hard plastics in recycling programs, though small wheel bearings typically need removal first. Proper disposal ensures materials don’t end up in landfills unnecessarily.
Traveling with Repaired Luggage
After completing repairs, test the luggage thoroughly before traveling. Load it with typical travel weight and roll it around the house, over different floor surfaces, and up and down any available ramps or inclines. This testing reveals any remaining issues that could cause problems during actual travel.
Pack a small repair kit in checked luggage for emergency fixes on the road. Include a multi-tool with screwdriver bits, a small amount of lubricant in a travel-sized container, and perhaps a spare wheel if space permits. These items weigh little but provide peace of mind and the ability to address problems away from home.
Conclusion
Fixing stuck luggage wheels is a manageable task that can save money, extend luggage life, and prevent travel headaches. Most wheel problems stem from simple causes like debris accumulation or lack of lubrication, both easily addressed with basic tools and a few minutes of effort. Even more serious issues like bearing failure or wheel damage can be resolved through affordable replacement parts and straightforward installation procedures.
Regular maintenance, including post-trip inspections and periodic lubrication, prevents many wheel problems from developing in the first place. When problems do occur, addressing them promptly prevents minor issues from becoming major failures at inconvenient times.
The skills and knowledge gained from luggage wheel repair extend beyond just fixing suitcases. Understanding basic mechanical principles, learning to troubleshoot problems systematically, and developing confidence in DIY repairs all prove valuable in numerous situations. With these techniques, travelers can keep their luggage rolling smoothly for years to come.
Frequently Asked Questions
Can silicone spray be used instead of lubricant for luggage wheels?
Yes, silicone spray works excellently for lubricating luggage wheels and is often easier to apply than heavier lubricants. It provides long-lasting lubrication without attracting dirt and dust. Apply a light coating to the axle and moving parts, then wipe away any excess. Avoid petroleum-based sprays as they can damage rubber and plastic components over time.
How often should luggage wheels be maintained?
Inspect wheels after every trip and perform basic cleaning to remove visible debris. Apply fresh lubrication every three to six months with regular use, or annually for occasional travelers. Heavy travelers who use luggage weekly should consider monthly inspections and quarterly lubrication. Regular maintenance takes only minutes but significantly extends wheel lifespan.
Is it possible to upgrade luggage wheels to better quality ones?
Yes, aftermarket wheels often exceed original equipment quality. When replacing wheels, look for options made from high-grade polyurethane with sealed ball bearings for superior durability and smoother rolling. Ensure replacement wheels match the original diameter and axle specifications. Upgrading all four wheels simultaneously provides the best results and even rolling characteristics.
What causes luggage wheels to squeak, and how can it be fixed?
Squeaking typically indicates insufficient lubrication or bearing wear. Clean the wheels thoroughly, removing all debris, then apply silicone lubricant to the axle and bearing areas. If squeaking persists after lubrication, the bearings may be worn and require wheel replacement. Sometimes dust shields around bearings cause squeaking when they contact the wheel; slight adjustment or removal of these shields can resolve the issue.
Are replacement wheels universal, or must they match the luggage brand?
Replacement wheels don’t need to match the luggage brand, but they must match the specifications. Measure the wheel diameter, axle diameter, and axle length before ordering. Most luggage uses standard sizes, making replacement wheels widely compatible. Focus on matching dimensions and mounting style rather than brand. Many universal wheels fit multiple luggage brands and often offer quality improvements over originals.


